Explore the complete digital lab workflow for modern dental laboratories, from scan intake and CAD design to milling, finishing, quality control, and delivery.
Table of contents [Show]
- What Digital Lab Workflow Means
- Full Digital Lab Workflow Overview
-
Step-By-Step Digital Lab Workflow
- Step 1: Receive STL, PLY, Or OBJ File
- Step 2: Review Margin Clarity
- Step 3: Check Contacts And Occlusion
- Step 4: Design Restoration In CAD
- Step 5: Nest Restoration
- Step 6: Mill Or Print
- Step 7: Sinter, Crystallize, Or Cure
- Step 8: Characterize
- Step 9: Polish Or Glaze
- Step 10: Verify On A Model If Needed
- Step 11: Inspect Final Restoration
- Step 12: Deliver
- Digital Workflow By Material
- Benefits And Limitations Of Digital Lab Workflow
- Why Digital Workflow Matters For Dental Lab Outsourcing
- Key Takeaways
Digital lab workflow is the computer-assisted process dental laboratories use to convert scan data into a finished dental restoration. In fixed prosthodontics, this workflow replaces many analog production steps with software-guided design, machine-assisted manufacturing, and controlled post-processing. The process typically begins with receiving scan files such as STL, PLY, or OBJ and continues through design, nesting, milling or printing, sintering or curing, finishing, inspection, and delivery.
What makes digital workflow important is not simply speed or technology. Its real value lies in repeatability, traceability, communication, and precision when each step is properly controlled. In modern dental laboratories, the digital workflow does not eliminate prosthodontic fundamentals. It translates them into a digital environment. Margin clarity, occlusion, contact strength, emergence profile, material thickness, connector design, polishing quality, and final inspection still determine whether a restoration succeeds clinically.
What Digital Lab Workflow Means
A digital lab workflow is a CAD/CAM-based production pathway for manufacturing dental restorations and related devices from digital scan data. It uses digital file intake, computer-aided design, computer-aided manufacturing, and material-specific finishing protocols.
Common Applications In Dentistry
Digital lab workflow is used for:
- Single crowns
- Veneers
- Inlays and onlays
- Bridges
- Implant crowns
- Implant bridges
- Full-arch implant prostheses
- Diagnostic wax-ups
- Provisional restorations
- Occlusal splints
- Surgical guides
- Custom trays
- Models
- Frameworks
Why Digital Workflow Matters
The workflow supports:
- Faster case turnaround
- Better design standardization
- Easier file sharing between clinic and lab
- Repeatable CAD parameters
- Digital case storage for remakes
- Scalable production across teams and locations
- Reduced analog errors in fully digital cases
Even with these advantages, digital workflow still depends on technician judgment. The software can propose a margin or generate anatomy, but it cannot replace clinical reasoning and material awareness.
Full Digital Lab Workflow Overview
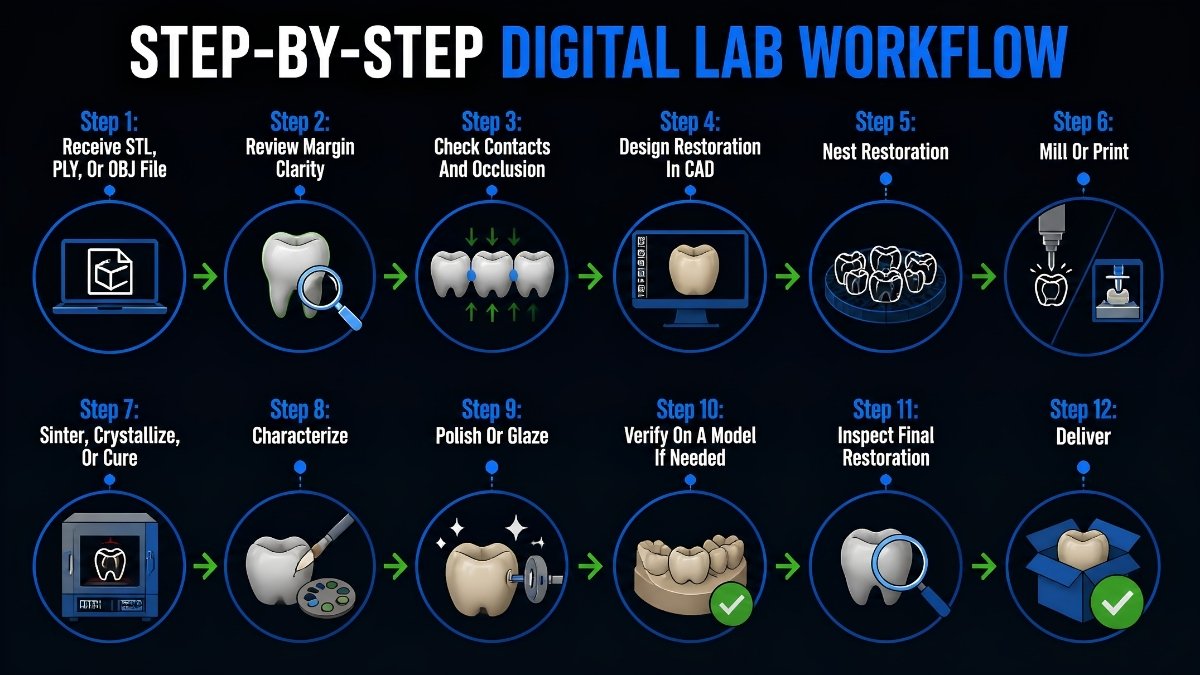
The digital workflow for fixed prosthodontics generally follows a clear production sequence.
Standard Workflow Sequence
- Receive STL, PLY, or OBJ file
- Review margin clarity
- Check contacts and occlusion
- Design restoration in CAD
- Nest restoration
- Mill or print
- Sinter, crystallize, or cure
- Characterize
- Polish or glaze
- Verify on a model if needed
- Inspect final restoration
- Deliver
Why This Sequence Matters
- Poor scan data creates margin errors
- Margin errors create fit problems
- Poor occlusal records create contact and articulation issues
- Incorrect design parameters reduce strength or seating
- Weak post-processing affects fit, shade, or durability
- Inadequate finishing can compromise function and tissue response
Digital production looks clean on a screen, but it still obeys the same old prosthodontic laws.
Step-By-Step Digital Lab Workflow
Below is the practical digital workflow used in modern dental laboratories.
Step 1: Receive STL, PLY, Or OBJ File
The digital process begins when the laboratory receives scan data from a clinic, design center, internal scanner, or outsourced partner.
Common File Sources
Digital case files may come from:
- Intraoral scanners
- Desktop model scanners
- CBCT merged with intraoral scans
- Facial scanners
- Photogrammetry systems
- Scan body scans for implant cases
- Diagnostic wax-up scans
- Existing provisional or denture scans
Common Dental File Formats
| File Format | What It Stores | Typical Use |
|---|---|---|
| STL | 3D surface geometry | Crowns, bridges, models, splints |
| PLY | 3D geometry plus possible color data | Soft tissue and esthetic communication |
| OBJ | 3D geometry plus texture or material data | Esthetic and facially driven design |
STL is the most common format because it is widely compatible. PLY and OBJ can preserve color or texture information, which may help with margin reading, gingival analysis, or shade planning.
Digital Intake Checklist
At file intake, the lab should confirm:
- Patient ID or case number
- Dentist or clinic name
- Tooth number
- Restoration type
- Requested material
- Shade and stump shade
- Opposing scan
- Bite scan
- Preparation scan
- Pre-op scan when relevant
- Implant system and platform
- Scan body library information
- Design instructions
- Due date
Common Intake Problems
| Problem | Risk |
|---|---|
| Missing opposing scan | Cannot design reliable occlusion |
| Missing bite scan | Occlusal relationship is uncertain |
| Unclear prescription | Wrong restoration or material choice |
| Wrong scan body library | Implant misfit risk |
| Open scan holes | Incomplete design data |
| Missing color file | Reduced esthetic planning information |
| Misaligned files | Design error and time loss |
The first quality checkpoint begins before the first click in CAD.
Step 2: Review Margin Clarity
Margin clarity is one of the most important factors in digital fixed prosthodontics.
What The Technician Should Evaluate
- Whether the finish line is visible 360 degrees
- Whether blood, saliva, or scan noise interferes
- Whether the margin is subgingival and incomplete
- Whether tissue blocks the preparation
- Whether scan holes or mesh artifacts are present
- Whether the preparation has undercuts
- Whether occlusal clearance is adequate
- Whether adjacent contacts are fully captured
- Whether the insertion path is practical
Common Software Review Tools
- Magnification
- Cross-section analysis
- Undercut detection
- Path-of-insertion review
- Margin marking tools
- Mesh repair tools
- Preparation reduction analysis
- Contact distance visualization
When A Rescan Is Needed
- The margin is unreadable
- Deep subgingival areas are missing
- Preparation data is contaminated
- The bite scan is unstable
- Arch alignment is distorted
- The scan body is incompletely captured
- Clearance is inadequate and cannot be resolved digitally
A digital crown cannot fit a margin that was never properly scanned. Software is clever, but it is not a magician.
Step 3: Check Contacts And Occlusion
Before designing, the lab must verify that the digital articulation is reliable.
Occlusal Checks
- Interocclusal relationship
- Bite scan alignment
- Opposing arch accuracy
- Adjacent tooth contacts
- Existing wear facets
- Functional cusp pathways
- Occlusal clearance
- Curve of Spee and Wilson
- Midline and arch form
- Implant emergence and screw-access direction
- Space for required material thickness
Why Digital Occlusion Can Be Challenging
- Quality of the buccal bite scan
- Number of captured teeth
- Patient stability during scan
- Scanner stitching accuracy
- Software alignment accuracy
- Full-arch scan quality
- Absence of soft tissue interference
High-risk cases such as full-arch restorations, long-span bridges, worn dentitions, or complex implant cases may still require physical model verification.
Occlusal Design Goals
- Stable contacts in maximum intercuspation
- No heavy premature contact
- Proper excursive clearance
- Harmonious cusp-fossa anatomy
- Adequate material thickness
- Reduced overload in implant restorations
- Minimal need for chairside adjustment
Step 4: Design Restoration In CAD
CAD design is the digital equivalent of waxing, contouring, and framework development.
What CAD Design Includes
- Margin line
- Insertion axis
- Cement space
- Internal relief
- Proximal contacts
- Occlusal contacts
- Anatomical contour
- Emergence profile
- Pontic form
- Connector dimensions
- Cutback for layering, if needed
- Screw-access channel for implant restorations
Common CAD Parameters
| CAD Parameter | Purpose |
|---|---|
| Cement gap | Allows seating and cement thickness |
| Extra cement gap | Relieves internal areas away from the margin |
| Margin thickness | Improves edge strength |
| Contact strength | Controls proximal contact tightness |
| Occlusal contact intensity | Helps reduce bite adjustment |
| Minimum thickness | Prevents fracture |
| Connector size | Protects bridge strength |
| Offset or spacer | Controls internal fit |
| Smoothing | Reduces sharp transitions |
| Anatomy library | Supplies morphology base shapes |
Material-Specific Design Rules
| Material | Primary Design Concern |
|---|---|
| Zirconia | Minimum thickness and connector size |
| Lithium disilicate | Ceramic thickness and margin support |
| Hybrid ceramic | Thickness and bonding surface design |
| PMMA | Provisional strength and connector size |
| Printed resin | Layer orientation and post-curing needs |
| Metal | Rigidity and porcelain support |
| Implant prosthesis | Passive fit and screw access |
Different materials have different personalities. Some are forgiving, some are dramatic, and zirconia tends to remember every design mistake.
Step 5: Nest Restoration
Nesting is the CAM preparation stage where the restoration is positioned inside a disc, block, puck, or print platform.
Nesting For Milling
- Disc or puck position
- Sprue placement
- Shade gradient orientation
- Bur access
- Margin protection
- Tool path efficiency
- Use of remaining material
- Sintering support orientation
Nesting For 3D Printing
- Build angle
- Support placement
- Layer orientation
- Platform efficiency
- Drainage behavior
- Surface accuracy
- Fit-surface protection
- Post-processing convenience
Why Nesting Matters
- Chipped margins
- Shade mismatch
- Bur collision issues
- Warpage
- Support marks
- Reduced strength
- Excessive waste
- Poor final fit
Nesting is where manufacturing efficiency and restoration quality shake hands.
Step 6: Mill Or Print
Digital production is completed through subtractive or additive manufacturing.
Milling
Milling removes material from a solid block, disc, or puck.
Common milled materials include:
- Pre-sintered zirconia
- Lithium disilicate
- PMMA
- Wax
- Composite blocks
- Hybrid ceramic
- Titanium
- Cobalt-chromium
3D Printing
3D printing builds an object layer by layer.
Common printed items include:
- Models
- Surgical guides
- Splints
- Custom trays
- Try-ins
- Denture bases
- Temporary crowns and bridges
- Castable patterns
- Gingival masks
- Some definitive resin restorations
Milling Vs Printing
| Feature | Milling | 3D Printing |
|---|---|---|
| Type | Subtractive | Additive |
| Best for | Crowns, bridges, ceramic restorations | Models, guides, splints, provisionals |
| Material waste | Higher | Lower |
| Accuracy | Excellent for many definitive restorations | Excellent in many applications |
| Material range | Ceramics, metals, PMMA, composites | Resins, wax-like materials, selected systems |
| Post-processing | Sintering, crystallization, polishing | Washing, support removal, post-curing |
Step 7: Sinter, Crystallize, Or Cure
After manufacturing, many materials require post-processing before they reach final strength and esthetics.
Zirconia Sintering
Pre-sintered zirconia is milled oversized and then sintered to final dimensions.
Important controls include:
- Correct furnace cycle
- Accurate temperature
- Proper hold time
- Controlled cooling
- Manufacturer-approved protocol
- Span support in long bridges
- Contamination prevention
Lithium Disilicate Crystallization
Some lithium disilicate blocks are milled in a partially crystallized state and then fired to:
- Reach final strength
- Develop final shade
- Improve translucency
- Prepare for stain and glaze
Resin Post-Curing
Printed resins typically require:
- Removal from build platform
- Washing in approved solvent
- Drying
- Support removal
- Validated post-curing
- Finishing and polishing
- Final inspection
Post-curing affects mechanical performance, dimensional stability, color stability, and biocompatibility.
Step 8: Characterize
Characterization gives the restoration a more natural appearance.
Common Characterization Methods
- External staining
- Internal staining
- Glazing
- Micro-layering ceramic
- Pink ceramic or composite for gingival zones
- Incisal effects
- Cervical chroma enhancement
- Fissure staining
- White spot effects
- Surface texturing
Characterization By Material
| Material | Common Approach |
|---|---|
| Monolithic zirconia | Stain and glaze, infiltration, micro-layering |
| Lithium disilicate | Stain and glaze or cutback layering |
| Feldspathic ceramic | Full layering and advanced effects |
| PMMA provisional | Polish, stain, or composite additions |
| Printed resin | Approved stain or coating methods |
| Full metal | High polish |
| Hybrid ceramic | Polishing or stain-glaze system |
Characterization should improve esthetics without creating rough surfaces or plaque-retentive anatomy.
Step 9: Polish Or Glaze
Surface finishing is a clinically significant part of the digital workflow.
Glazing
Glazing is commonly used for:
- Zirconia
- Lithium disilicate
- Layered ceramics
It improves esthetics and surface smoothness, though glaze can wear with function.
Polishing
Polishing is essential for:
- Monolithic zirconia
- Adjusted ceramic surfaces
- Occlusal contact areas
- Tissue-contact surfaces
- Implant emergence profiles
- Resin provisionals
- Printed appliances
Why Polishing Matters
A smooth surface helps reduce:
- Plaque retention
- Gingival irritation
- Opposing enamel wear
- Patient discomfort
- Staining
- Chairside adjustment time
Surface Finishing Recommendations
| Surface Area | Preferred Finish |
|---|---|
| Occlusal contact area | High polish |
| Tissue-contact pontic surface | Smooth high polish |
| Interproximal area | Smooth without rough scratches |
| Margin | Intact and polished |
| Facial esthetic surface | Balanced texture and gloss |
| Implant emergence profile | Smooth and cleanable |
Step 10: Verify On A Model If Needed
Not every digital restoration requires a model, but some cases benefit greatly from one.
When Model Verification Is Useful
A model is recommended when:
- The case has multiple units
- Contacts are uncertain
- Occlusion is complex
- Anterior esthetics are critical
- A long-span bridge is involved
- Implant fit must be verified
- Full-arch restoration is planned
- The digital bite is questionable
- The remake risk is high
Model-Free Workflows
Simple single-unit cases may be produced model-free when:
- Scan quality is high
- Margins are clear
- Bite registration is stable
- Contacts are captured well
- The lab and clinic follow calibrated protocols
Printed Model Considerations
- Printer calibration
- Resin type
- Layer thickness
- Orientation
- Post-curing
- Support placement
- Die accuracy
- Environmental storage
A printed model is helpful only when it tells the truth.
Step 11: Inspect Final Restoration
Final inspection is the last safety checkpoint before delivery.
Digital Lab QC Checklist
| QC Category | What To Inspect |
|---|---|
| Case identification | Patient ID, clinic, tooth number |
| Prescription match | Material, shade, restoration type |
| Fit | Seating, internal surface, margin |
| Margin quality | No chips, gaps, or overextensions |
| Contacts | Correct tightness and location |
| Occlusion | Proper contacts and clearance |
| Anatomy | Functional morphology |
| Thickness | Meets material minimums |
| Connector dimensions | Appropriate for bridge span |
| Surface finish | Smooth, polished, glazed as required |
| Shade | Matches prescription and references |
| Characterization | Natural and controlled |
| Implant interface | Correct library and clean seating |
| Screw access | Correct location and diameter |
| Documentation | Material lot, machine cycle, traceability |
| Cleanliness | No dust, debris, or uncured residue |
Common Inspection Tools
- Magnification
- Microscope
- Fit checker
- Contact spray
- Articulating paper
- Shimstock
- Calipers
- Thickness gauge
- Printed model
- Desktop scanner
- CAD comparison software
- Torque driver
- Shade light or photography system
Step 12: Deliver
The final restoration is packaged and returned to the clinic with supporting documentation.
Delivery Package May Include
- Final restoration
- Work authorization or invoice
- Material identification
- Lot number or certificate
- Implant screw when relevant
- Ti-base or abutment information
- Cementation recommendation
- Surface treatment note
- Seating instructions
- Model if requested
- QC approval record
Packaging Goals
- Fracture
- Chipping
- Contamination
- Case mix-up
- Screw loss
- Surface damage
- Moisture or heat damage
Digital dentistry is precise, but a crown can still lose its dignity in bad packaging.
Digital Workflow By Material
Different restorative materials follow different digital production paths.
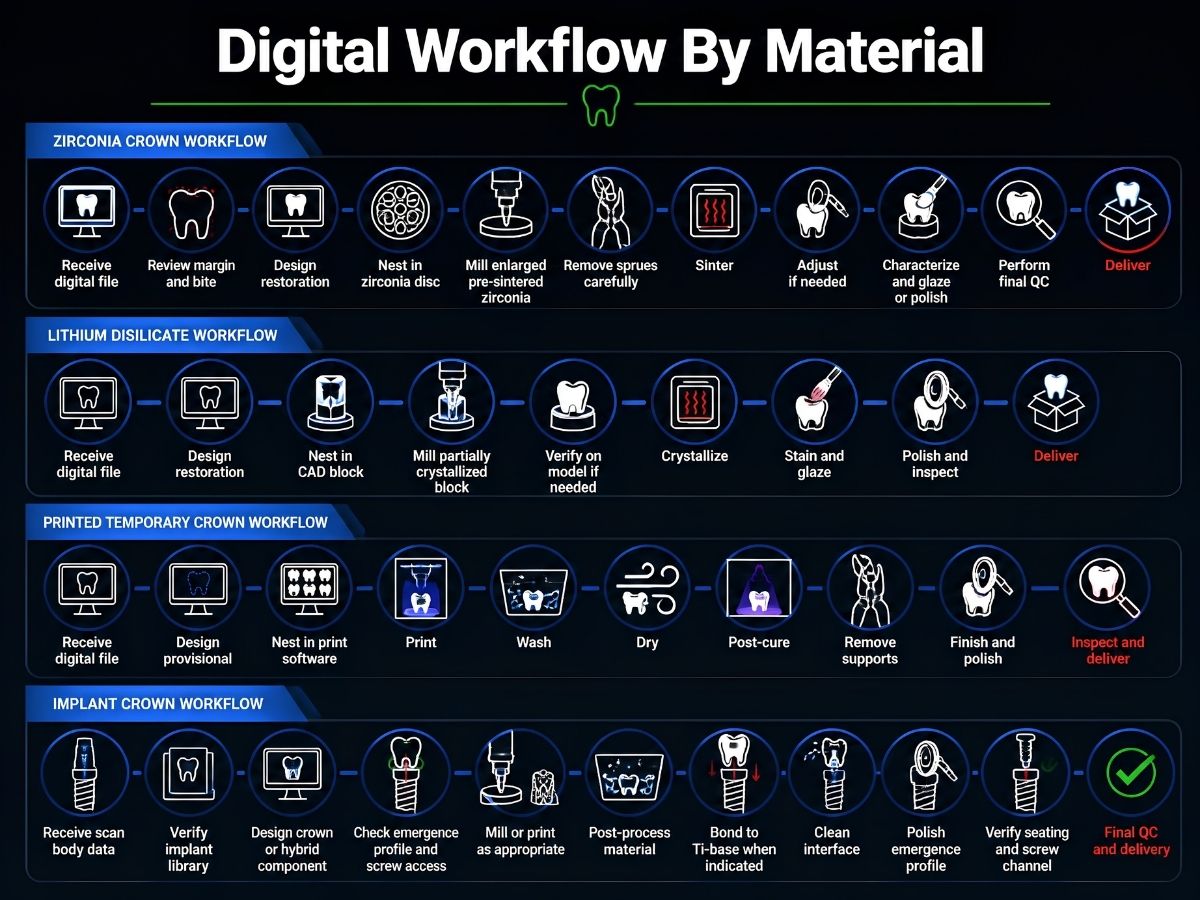
Zirconia Crown Workflow
- Receive digital file
- Review margin and bite
- Design restoration
- Nest in zirconia disc
- Mill enlarged pre-sintered zirconia
- Remove sprues carefully
- Sinter
- Adjust if needed
- Characterize and glaze or polish
- Perform final QC
- Deliver
Lithium Disilicate Workflow
- Receive digital file
- Design restoration
- Nest in CAD block
- Mill partially crystallized block
- Verify on model if needed
- Crystallize
- Stain and glaze
- Polish and inspect
- Deliver
Printed Temporary Crown Workflow
- Receive digital file
- Design provisional
- Nest in print software
- Wash
- Dry
- Post-cure
- Remove supports
- Finish and polish
- Inspect and deliver
Implant Crown Workflow
- Receive scan body data
- Verify implant library
- Design crown or hybrid component
- Check emergence profile and screw access
- Mill or print as appropriate
- Post-process material
- Bond to Ti-base when indicated
- Clean interface
- Polish emergence profile
- Verify seating and screw channel
- Final QC and delivery
Benefits And Limitations Of Digital Lab Workflow
Digital workflows offer strong advantages, but they also introduce new technical risks.
Benefits
| Benefit | Practical Meaning |
|---|---|
| Speed | Faster turnaround for many cases |
| Reproducibility | Designs can be saved and reused |
| Data storage | Easier remake and archive management |
| Consistency | Standardized parameters improve control |
| Material efficiency | Better nesting can reduce waste |
| Communication | File sharing is easier across teams |
| Accuracy | Strong results when workflow is controlled |
| Scalability | Supports centralized production systems |
Limitations
| Limitation | Risk |
|---|---|
| Poor scan quality | Margin and fit issues |
| Bite scan error | High or open occlusion |
| Library mismatch | Implant misfit |
| Overuse of auto-design | Weak anatomy or poor emergence profile |
| Bur wear | Chipped margins or inaccurate fit |
| Printer calibration error | Distortion or dimensional error |
| Inadequate post-curing | Weak or unsafe resin appliance |
| Wrong furnace cycle | Poor shade, fit, or strength |
Technology improves tools, not judgment. That part still comes from people.
Why Digital Workflow Matters For Dental Lab Outsourcing
Digital workflow is especially important for dental lab outsourcing because it supports remote collaboration, repeatable production, and high-volume case management.
What Dental Practices Should Look For
A reliable outsourcing partner should provide:
- Stable digital file intake
- Strong CAD design expertise
- Material-specific manufacturing knowledge
- Verified milling and printing protocols
- Controlled sintering and curing processes
- Final QC and traceability
- Clear communication on scan quality and case requirements
- Support for both simple and advanced implant cases
Where XDENT LAB Fits
For practices seeking a Vietnam dental lab or lab-to-lab service partner, XDENT LAB’s digital workflow strength comes from combining:
- Skilled technicians
- Scalable production capacity
- FDA and ISO-aligned standards
- Technology-driven manufacturing
- Reliable quality control
- Support for removable, fixed, and implant-related cases
This combination is important because digital dentistry is only as reliable as the team and system behind it.
Key Takeaways
Digital lab workflow is the structured process of turning scan data into a finished dental restoration through file review, CAD design, CAM production, post-processing, finishing, inspection, and delivery. It improves speed, consistency, traceability, and scalability, but it still depends on prosthodontic knowledge and careful quality control.
The most important success factors are accurate file intake, clear margins, reliable bite records, correct CAD parameters, validated manufacturing, proper sintering or curing, smooth finishing, and final inspection. For dental practices working with an outsourcing partner, choosing a laboratory that combines digital capability with material expertise and disciplined QC is essential for consistent restorative outcomes.
About XDENT LAB:
We are experts in Lab-to-Lab Full Service from Vietnam, with the signature services of Removable, meet U.S. market standards, FDA-registered, ISO 13485-certified. Founded in 2017, from local root to global reach, we scale with 2 Factories with over 100+ employees.
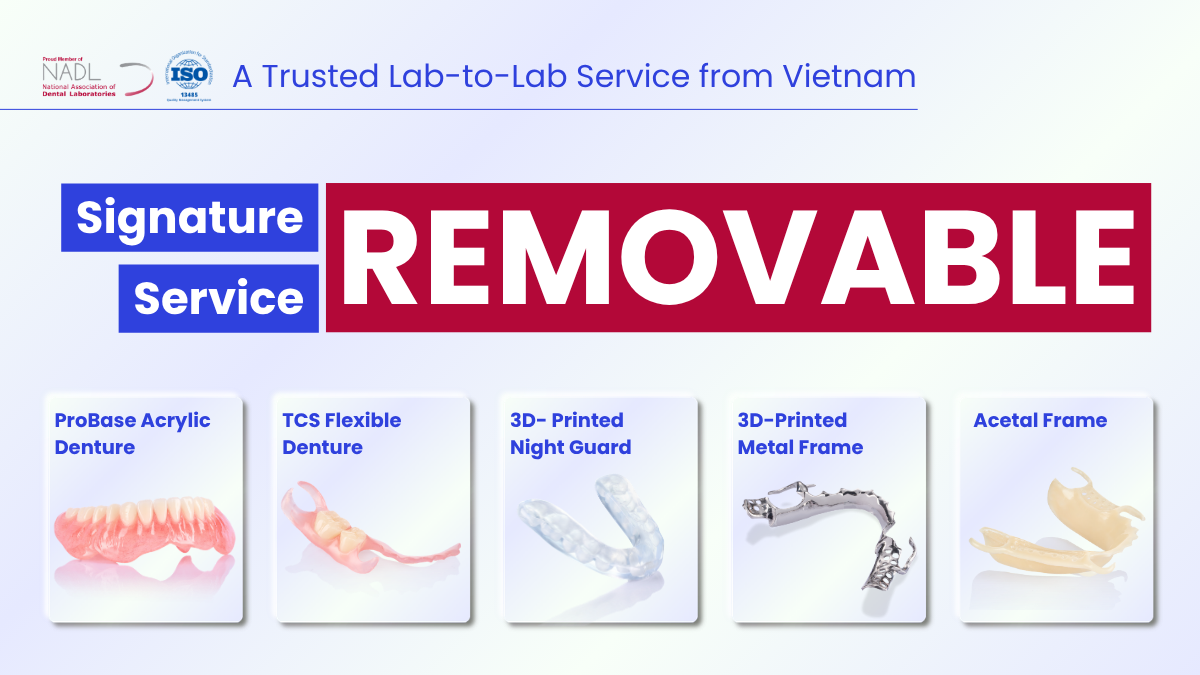
Our Commitments Built on “Trusted. Commitment. Quality”
- Commit to Large-Scale Manufacturing, high volume, remake rate < 1%.
- Commit to 5-Year Warranty
- Commit to Competitive Price
XDENT LAB | A Trusted Lab-to-Lab Service from Vietnam
Share this post:
Related Posts
See 5 Acrylic Partial Denture cases (cases 11 to 15) from XDENT LAB, a Vietnamese dental laboratory that is a member of the National Association of Dental Laboratories (NADL). XDENT LAB is an expert i...
Explore how independent dental labs support dentistry through custom restorations, digital workflows, quality control, and material traceability.
Learn how B2B dental labs improve quality and consistency for dental practices through digital workflows, material control, expert QC, and reliable turnaround.

